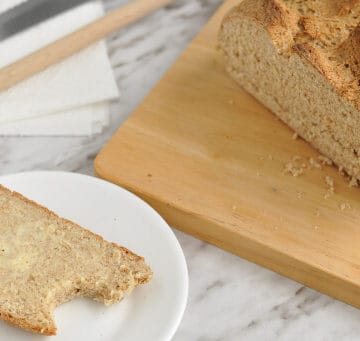
That's it - I'm convinced I'm magic. Why? Because I turned a thick, gloopy dough into this. This wonderful piece of bakery goodness. This wonderful loaf which is soft and chewy on the inside and crisp and crunchy on the outside. This Simple Homemade No-Knead Ciabatta.
And you know what? To share the magic - it sucks being magic on your own, where's the fun in that? - I'm going to show you how you can make it, too! All with minimal ingredients, effort, fuss and time.

I say minimal time...This bread actually needs to be prepped the day before baking and 24 hours is kind of a lot of time when it comes to baking and cooking...but it's not like you have to spend the full 24 hours in the kitchen staring at the dough. You could go for a walk in the snow, devour a batch of cupcakes or take a super-long nap.
After you've mixed your dough and left it all day and night to rise, you'll need to shape it and plop it onto some foil or baking paper whilst you heat your oven up to hot hot hot (that's the scientific term for the temp, you know) which is a wonderful way to warm your house up when it's chilly.

When the oven's so hot you're worried it might be a volcano about to erupt, quickly stick the bread in and close the oven door. Do not be tempted to open the oven at any time! (Unless you see flames) Opening the oven door will result in a drop in temperature which will result in a less than fabulous ciabatta loaf and who would settle for anything less than fabulous?
When it's cooked, whip the loaf out of the oven and leave it to cool on a wire wrack for as long as you can. If you cut into it straight away the middle won't be cooked fully and it will be a bit doughy. Leaving the loaf for around 30 minutes (the temptation will drive you - and anyone within your vicinity - crazy!) will ensure the middle is fully cooked whilst still being wonderfully warm for you to enjoy slathered with butter, Nutella, jam or...bacon?

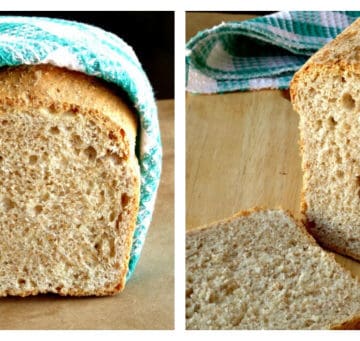
This bread recipe has got to be one of the best I've ever made and since I first started baking my bread, I've gone through a lot of bread recipes! This is definitely the crunchiest crust I've ever been able to create and the centre is just so chewy and YUM! We used this bread to make sandwiches for our camping trip and they turned out fabulous.
I can only tell you that this bread is fine on the day you bake it (scratch that, it's AMAZING on the day you bake it!) and perfectly yummy on day two and day three. I can't vouch for any time longer than that because there wasn't any left - it's that good!
📖 Recipe

Ingredients
- 1 tablespoon white sugar
- 1 ½ cups warm water
- ¼ teaspoon dried active yeast
- 4 cups all-purpose white flour
- 1 teaspoon salt
Instructions
- Pour the warm water into a large bowl and stir in the sugar.
- Sprinkle the yeast on top and leave for 10 minutes to bloom.
- Pour in the white flour and salt and stir until everything comes together.
- Cover the bowl with plastic wrap and leave to rise for between 20 and 25 hours at room temperature.
- When you're ready to bake, preheat the oven to 500F/250C and put a large baking tray or Pyrex dish (large enough to bake your loaves in) in the centre of the oven.
- Tear off two pieces of tin foil that are large enough to cover the tray or dish and set to one side.
- Punch the dough down and divide it into two halves.
- Roll each half out onto a floured surface and form into a ciabatta/baguette shape.
- Space the loaves out on one of the sheets of foil that you prepared and leave to one side to rise for 30 minutes.
- After 30 minutes, pull your very hot baking tray or dish out of the oven and place the foil with the loaves on inside the dish. Immediately cover the loaves loosely with the other piece of tin foil and bake covered for 30 minutes.
- After 30 minutes, remove the top piece of tin foil and bake for a further 10 minutes or until the tops of the loaves are golden brown.
- Remove the loves from the oven and leave to cool slightly on a wire wrack before slicing.
Kel
I am not experienced in the art of bread making.
I have 2 questions:
1. on step 9 do you spray foil with Pam or something that would help the foil not stick to the loafs?
2. Could you use a baguette pan for the loafs?
Thank you in advance.
Kel
Nicola Quinn
Hi Kel,
Thanks for stopping by! Here are my answers:
1. I actually used greaseproof paper, so I could easily peel the loaves off. If you're using foil, I definitely recommend greasing it first - I would use regular oil for this.
2. You can use any sort of pan, providing it's larger than the dough, of course. If the pan is too small, you won't get the signature ciabatta shape and it will mould to the pan instead.
I hope this helps! 🙂
Jess @ On Sugar Mountain
Oh my this ciabatta looks to-die-for! Having a loaf of this just whenever I want at my house could be dangerous though. 😉 So glad I jumped over from Tasty Tuesdays to check out this bread recipe!
Joy @ Yesterfood
Nicky, this is going to be huge. It's already getting lots of attention at Treasure Box Tuesday! I have pinned and tweeted! Thanks for partying with us! ♥
Cathy
Thank you for linking up at Tasty Tuesdays! Your post has been pinned to my Recipes from Tasty Tuesday board. I can't wait to see what you link up next week!
Have a terrific week!
Cathy
APeekIntoMyParadise.com
#TastyTuesdays
Lisa
I LOVE homemade breads. Please come over and link this up with "Try a New Recipe Tuesday." I'd love to have you join us. 🙂 http://our4kiddos.blogspot.com/2014/02/try-new-recipe-tuesday-february-18.html
Charlie
This looks fantastic! Thank you for sharing the recipe!
Daphne
Good Evening Nicola, I love Ciabatta and I am thrilled that you shared this recipe with us. I have decided to take your advice, and eat a load of cupcakes, rather than take a walk in the snow, whilst I wait for my bread to prove.... well that sounds like a very good idea to me!
I have enjoyed my visit so I have become a new follower.
Best Wishes
Daphne
Heather {Woods of Bell Trees}
I LOVE No Knead breads! I haven't tried the ciabatta, but can't wait!!!
Winnie
It's a fantastic looking ciabatta!!
I love working with yeast (I specialize in baking challahs) and I'd love to try this recipe
Thank you for sharing
Pinning
aprila
this looks so good. I will have to make this real soon. Thanks for linking up at Tell Me About It Tuesday. We hope you hop over and share with us again next week.
Jill
Saw you over on Kitchen Fun with My 3 Sons. This bread looks beautiful. I love Ciabatta, but had never thought about making it myself. Definitely going to try since it sounds so easy!
Julie
We made this bread today...it was completely devoured within 30 minutes! Soooo good! Thanks 🙂
Joy @ Yesterfood
Nicky, this was the most-viewed link at Treasure Box Tuesday this week! It will be the #1 feature at our 2/25 party! ♥
Jocelyn
This is a terrific bread! Your instructions were very clear and easy to follow. Thanks so much.